Event Streams
Send message data out of OneSignal in real-time to your chosen destination.
Event Streams allows you to send message data out of OneSignal in real-time to your chosen destination. Event streams are a great way to connect OneSignal to other products within your marketing ecosystem. They enable your team to trigger corresponding messaging, maintain records, and much more.
Common use cases
- Customer journey mapping and personalization: stream events to a CRM or Customer Data Platform (CDP) to build comprehensive customer profiles and tailor campaigns across various touchpoints.
- Analysis and reporting: send message events (e.g., sends, opens, clicks) to a data warehouse to analyze engagement patterns or long-term trends across channels.
- Compliance and regulatory reporting: stream all message-sent data to a data warehouse for auditing and compliance purposes.
- AI and predictive models: send message event data to in-house AI or predictive models to create comprehensive customer cohorts and understand churn risks—such as email unsubscribes or message dismissals, which may indicate potential churn.
- Marketing automation: send engagement events (like message opens or clicks) to other tools to automatically trigger the next steps in the user journey or update customer profiles and recent activity.
- Data fragmentation: valuable customer data often resides in separate tools (such as customer engagement platforms, CRMs, analytics tools, and data warehouses). Event streaming helps centralize this data, increasing visibility into valuable first-party data and allowing for faster revenue outcomes.
- Slow communication between systems: by sending live engagement events to other systems, you can trigger actions immediately after an event occurs, rather than waiting hours or days for batched updates. This eliminates reliance on manual imports or data syncs.
- Spend bloat and technical debt: instead of managing multiple intermediary tools, you can directly connect OneSignal with your data warehouse. This reduces the costly overhead of managing multiple integrations or custom data pipelines, lessens technical debt, and preserves valuable technical resources for product and marketing.
How to partner with your technical team
Setting up Event Streams requires collaboration with your technical team. Here are some tips to facilitate the conversation:
-
Explain the benefits: share your strategy for using this data and how it can enhance marketing campaigns, personalize user experiences, consolidate data, and reduce technical debt.
-
Define the scope: identify where you want the data to be sent, which events you want to track, and the estimated data volume. This will aid in configuring the proper endpoint setup.
-
Provide technical documentation: share OneSignal’s technical documentation and setup instructions. Your development team will need to configure the recipient endpoints and the event stream in OneSignal, ensuring data is routed correctly.
-
Discuss data volume and management: confirm that your systems can handle real-time data flows. It’s recommended that the API handler records events without additional online processing to maintain low response times.
-
Test and troubleshoot: conduct tests to ensure everything is functioning smoothly before going live.
By working closely with your technical team, you can unlock the power of event streaming to enhance your growth strategy.
Setup
You can configure a new event stream for your OneSignal application under Data > Event Streams.
Requirements
Events can't be sent unless the following requirements are met:
- A valid URL or IP address pointing to your server HTTP(S) server
- URLs and IP addresses must be publicly routable
- Domains must include a recognized top-level domain (e.g., “.com”, “.net”)
Event Selection
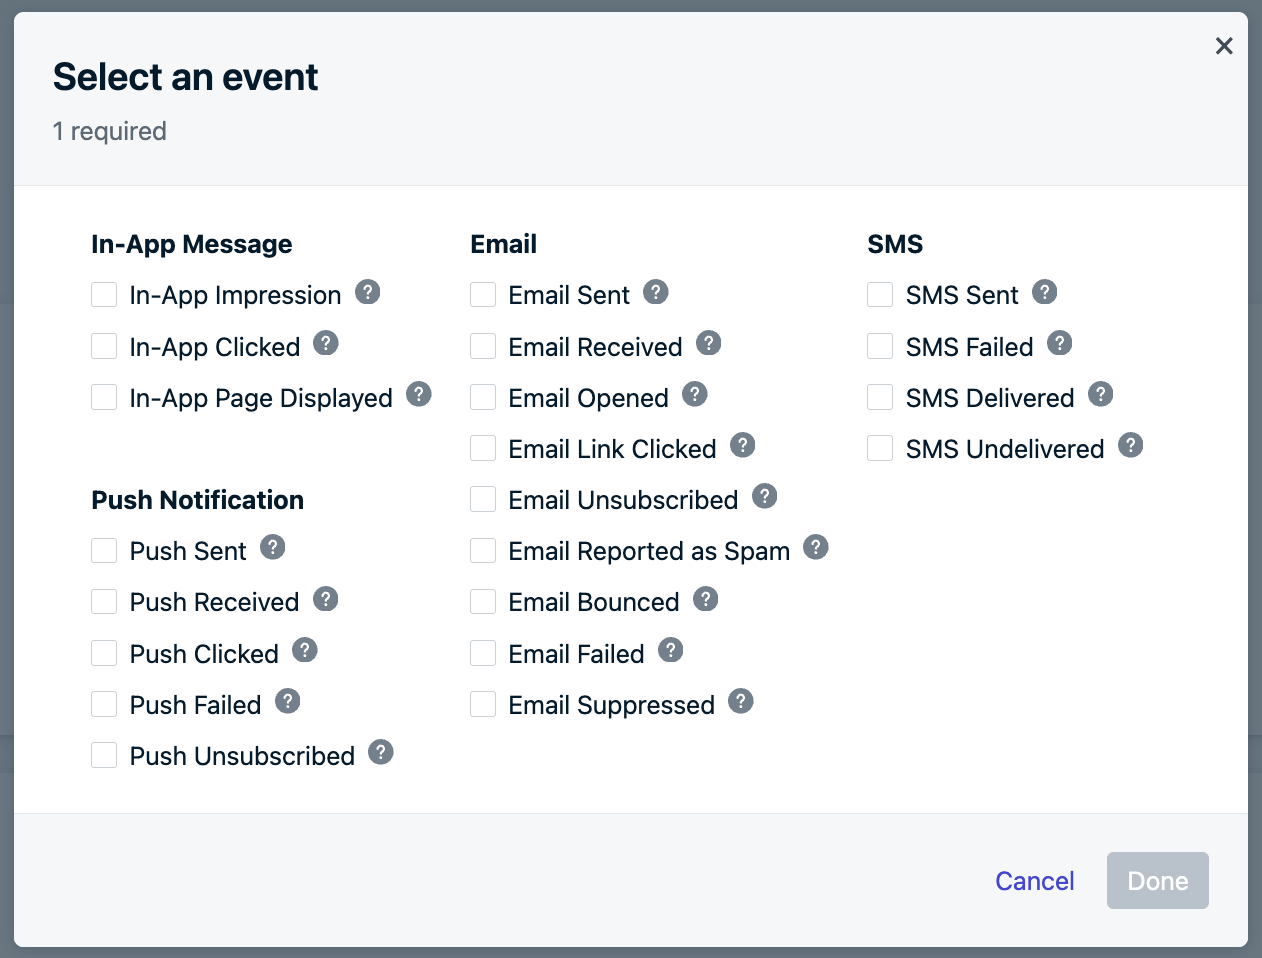
Click “Select Events” to select your choice of events to trigger an event stream.

The data that may be sent with these events all similar enough that you can send events triggered by multiple channels through the same event stream. Another approach would be to define multiple event streams each for a single channel or event for more granular control or to reduce the scale of data sent.
Event stream filters
You can optionally further refine events by specifying the identifiers of one or more messages or templates, enabling you to receive only events related to specific messages within your app. Refer to the instructions below to enable event stream filtering.
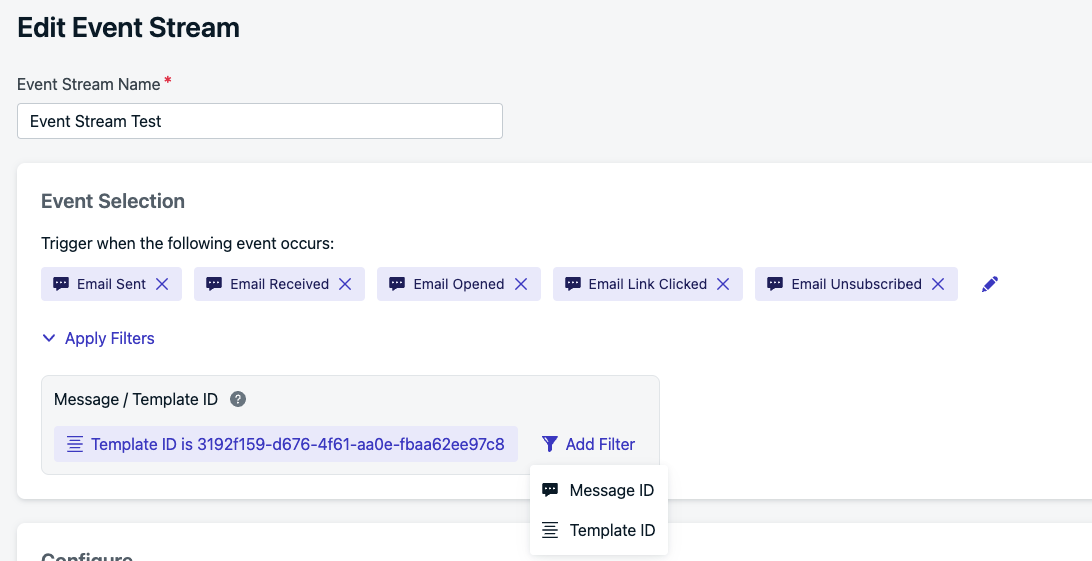
Filtering events by template
Message and template identifiers can be copied by navigating to Messages > Push, Emal, SMS, or Teamlates, -clicking the action button of the desired message or template, and selecting Copy Message ID or Copy Template ID from the action menu.
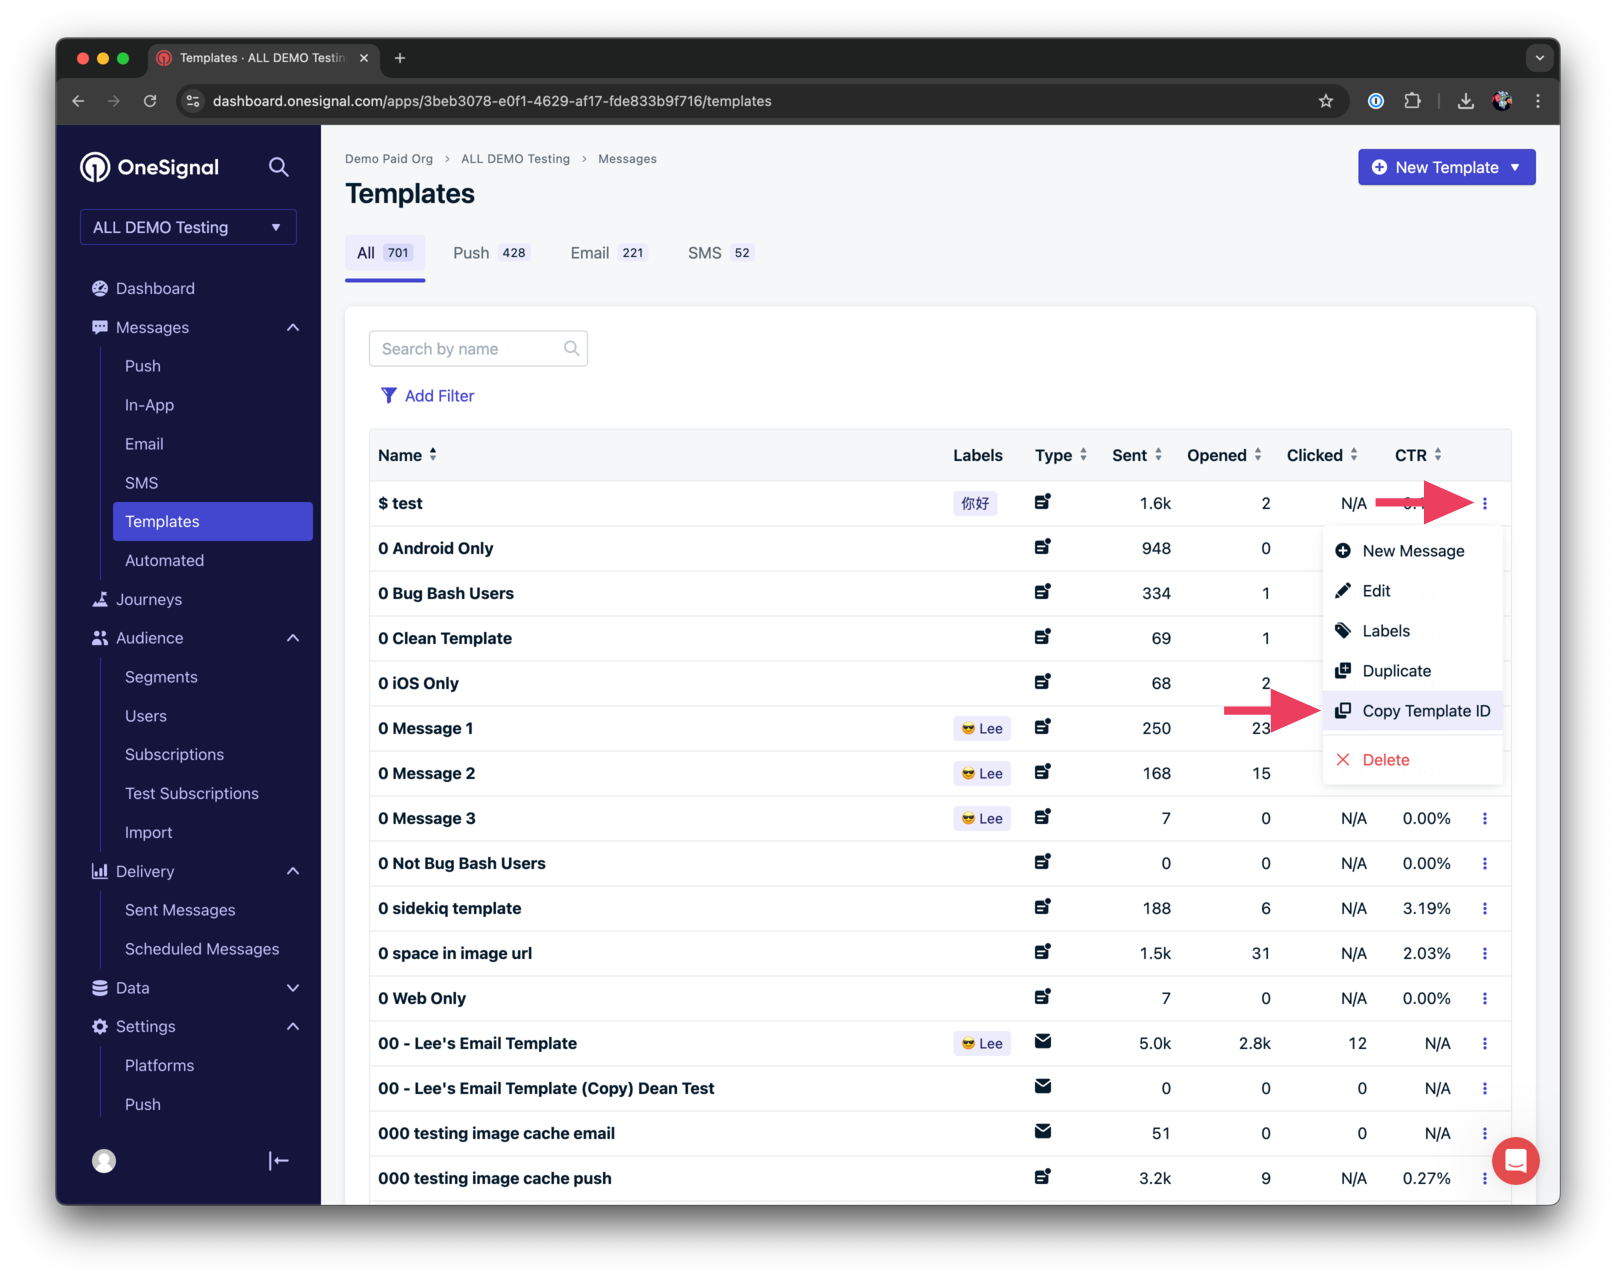
Copying the Template ID of a template
Alternatively, you can copy the message/template identifier of what you're viewing directly from the URL :
- Template –
https://dashboard.onesignal.com/apps/{APP_ID}/templates/{TEMPLATE_ID} - Push –
https://dashboard.onesignal.com/apps/{APP_ID}/notifications/{MESSAGE_ID} - Email –
https://dashboard.onesignal.com/apps/{APP_ID}/email/{MESSAGE_ID} - SMS –
https://dashboard.onesignal.com/apps/{APP_ID}/sms/{MESSAGE_ID}
Configure the Event Stream
Select the HTTP method, the URL, and add headers for the event stream this is where authentication will often be. The URl and Headers can contain liquid syntax which will come from both the user properties, but also properties of the event stream.
You may add any headers needed, common examples being an Authorization key, with values like Basic {{YOUR_TOKEN}} or Bearer {{YOUR_TOKEN}} where YOUR_TOKEN is provided by your system or 3rd party. OneSignal does not provide encryption services.
If you are looking for an easy way to test, use webhook.site. Find “Your unique URL” in the center of the page. Copy that URL.
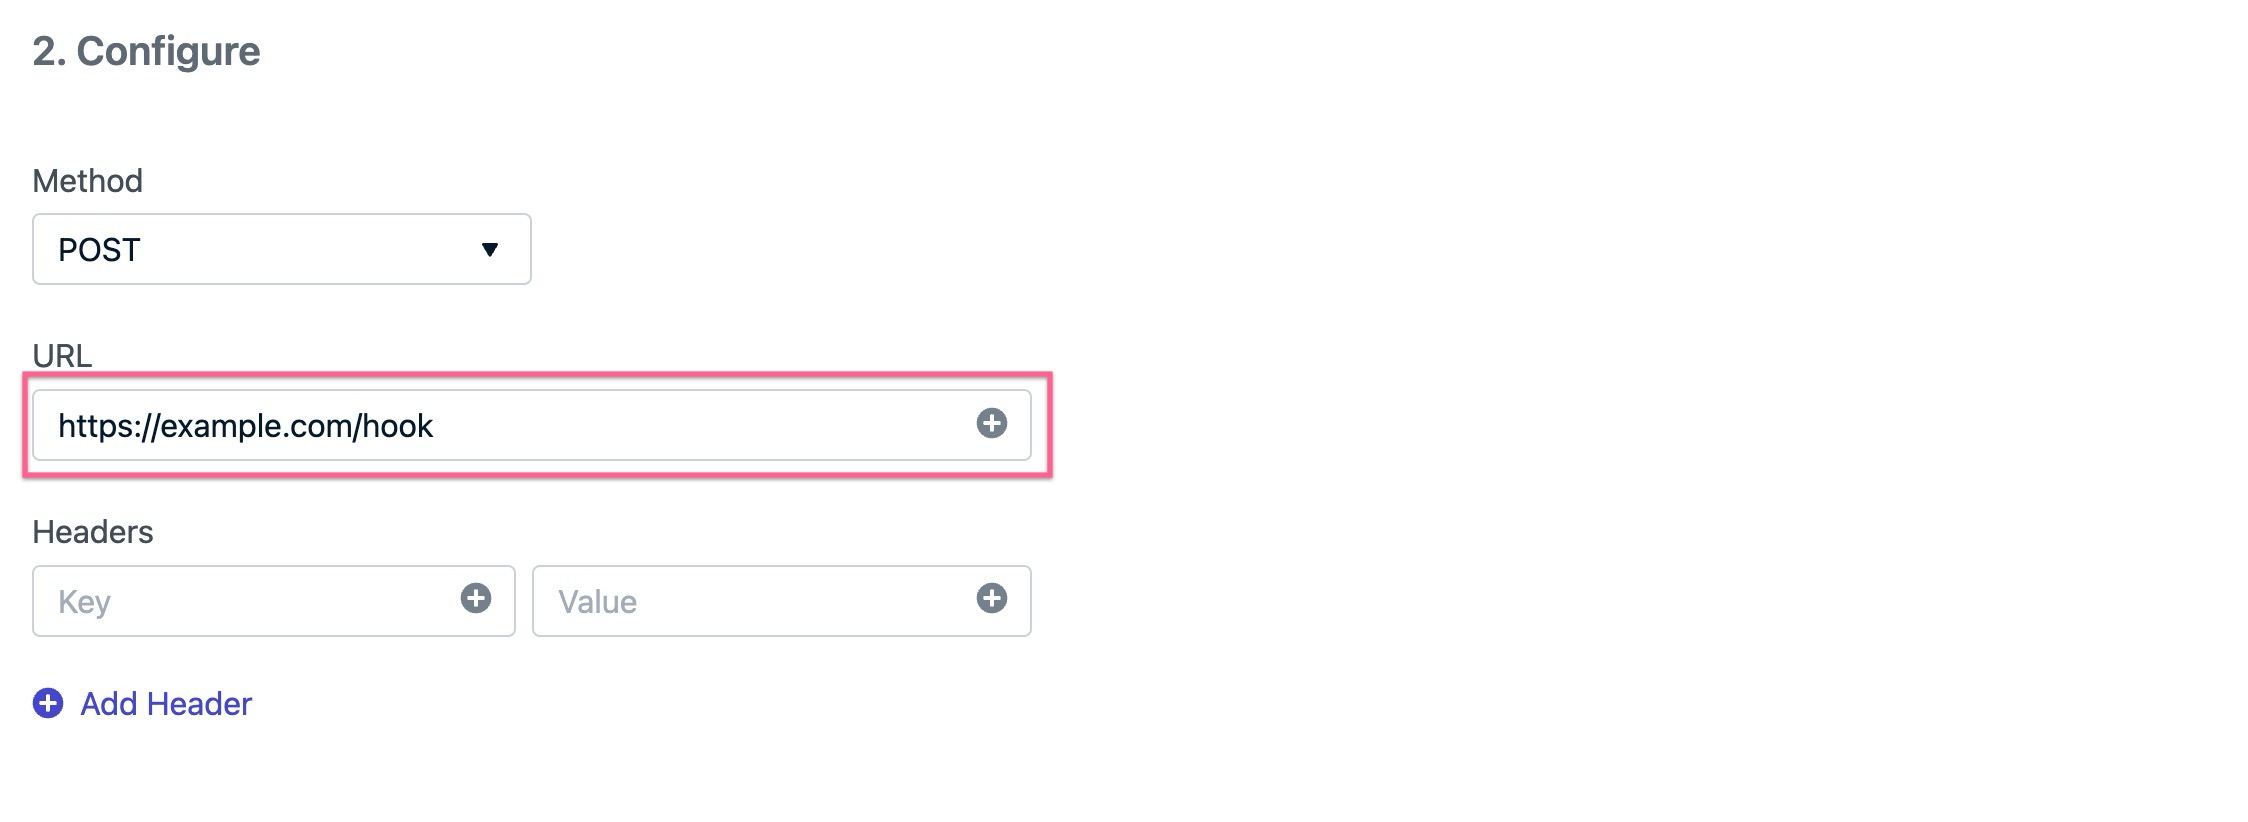
Disallowed headers
The following headers are restricted and can't be set.
content-lengthrefereruser-agentmetadata-flavorx-google-metadata-requesthostx-onesignal*
Body
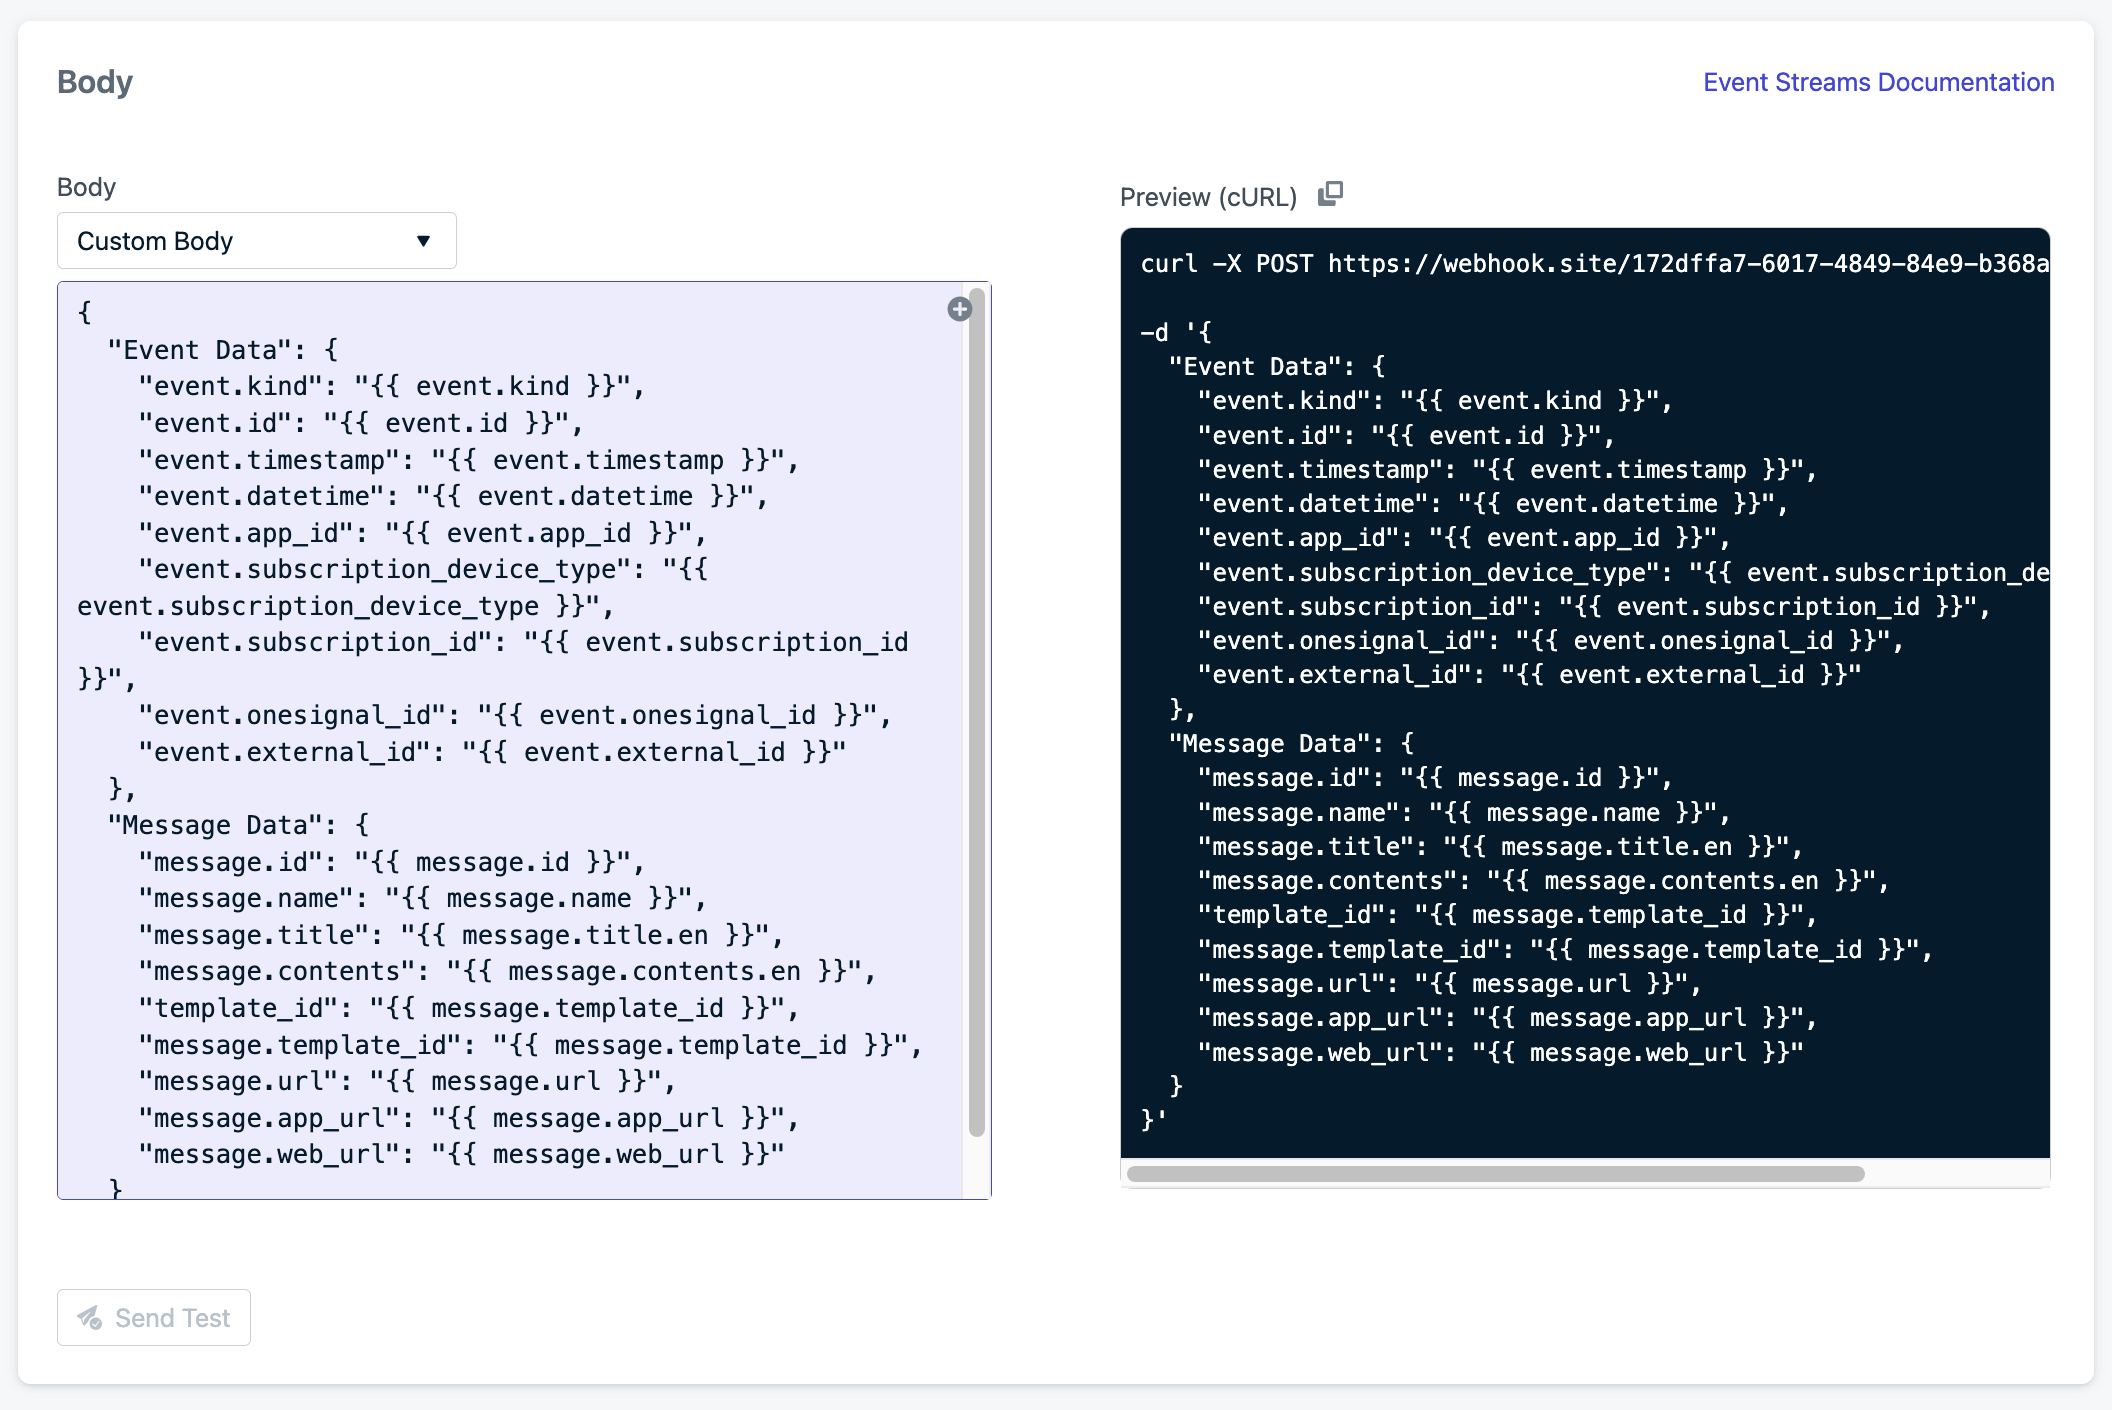
The body for an event stream will be JSON. The body JSON can be defined either as individual key/value pairs or as an editable code block. To change the input method use the first dropdown under the body heading and select the custom body.

On the right, you can see an example cURL request built from what has been input during event stream setup

Personalization
You can personalize all fields in your Event Stream with predefined Event Streams Data. This data can be added using Liquid Syntax. This gives you the flexibility to use event streams for nearly any use case.
Event Streams Data
See Event Streams Data for a list of all event, message, and user event data available for personalization.
Example body
Select the "Custom Body" in the drop-down:
{
  "Event Data": {
    "event.kind": "{{ event.kind }}",
    "event.id": "{{ event.id }}",
    "event.timestamp": "{{ event.timestamp }}",
    "event.datetime": "{{ event.datetime }}",
    "event.app_id": "{{ event.app_id }}",
    "event.subscription_device_type": "{{ event.subscription_device_type }}",
    "event.subscription_id": "{{ event.subscription_id }}",
    "event.onesignal_id": "{{ event.onesignal_id }}",
    "event.external_id": "{{ event.external_id }}"
  },
  "Message Data": {
    "message.id": "{{ message.id }}",
    "message.name": "{{ message.name }}",
    "message.title": "{{ message.title.en }}",
    "message.contents": "{{ message.contents.en }}",
    "template_id": "{{ message.template_id }}",
    "message.template_id": "{{ message.template_id }}",
    "message.url": "{{ message.url }}",
    "message.app_url": "{{ message.app_url }}",
    "message.web_url": "{{ message.web_url }}"
  }
}
Using Liquid Syntax in JSON
When using Liquid syntax within JSON, proper quoting depends on the data type:
Guidelines for JSON Formatting
- Strings → Must wrap in quotes.
- Numbers → Don't wrap in quotes.
- Objects → Must not be wrapped in quotes.
Examples
Strings
✅ Correct
// Wrap string values in quotes
{
  "user_id": "{{ user.onesignal_id }}"
}
❌ Incorrect
{
  "user_id": {{ user.onesignal_id }}
}
Numbers & Booleans
✅ Correct
// Don't wrap numbers or booleans in quotes
{
  "user_score": {{ user.tags.score }}
}
❌ Incorrect
{
  "user_score": "{{ user.tags.score }}"
}
Objects
✅ Correct
// Don't wrap objects in quotes.
{
  "user_data": {{ user.tags }}
}
❌ Incorrect
{
  "user_data": "{{ user.tags }}"
}
Personalize messages with Liquid Syntax
For details and options on how to personalize your messages using Liquid syntax, check out our Using Liquid Syntax Guide.
Results & Debugging
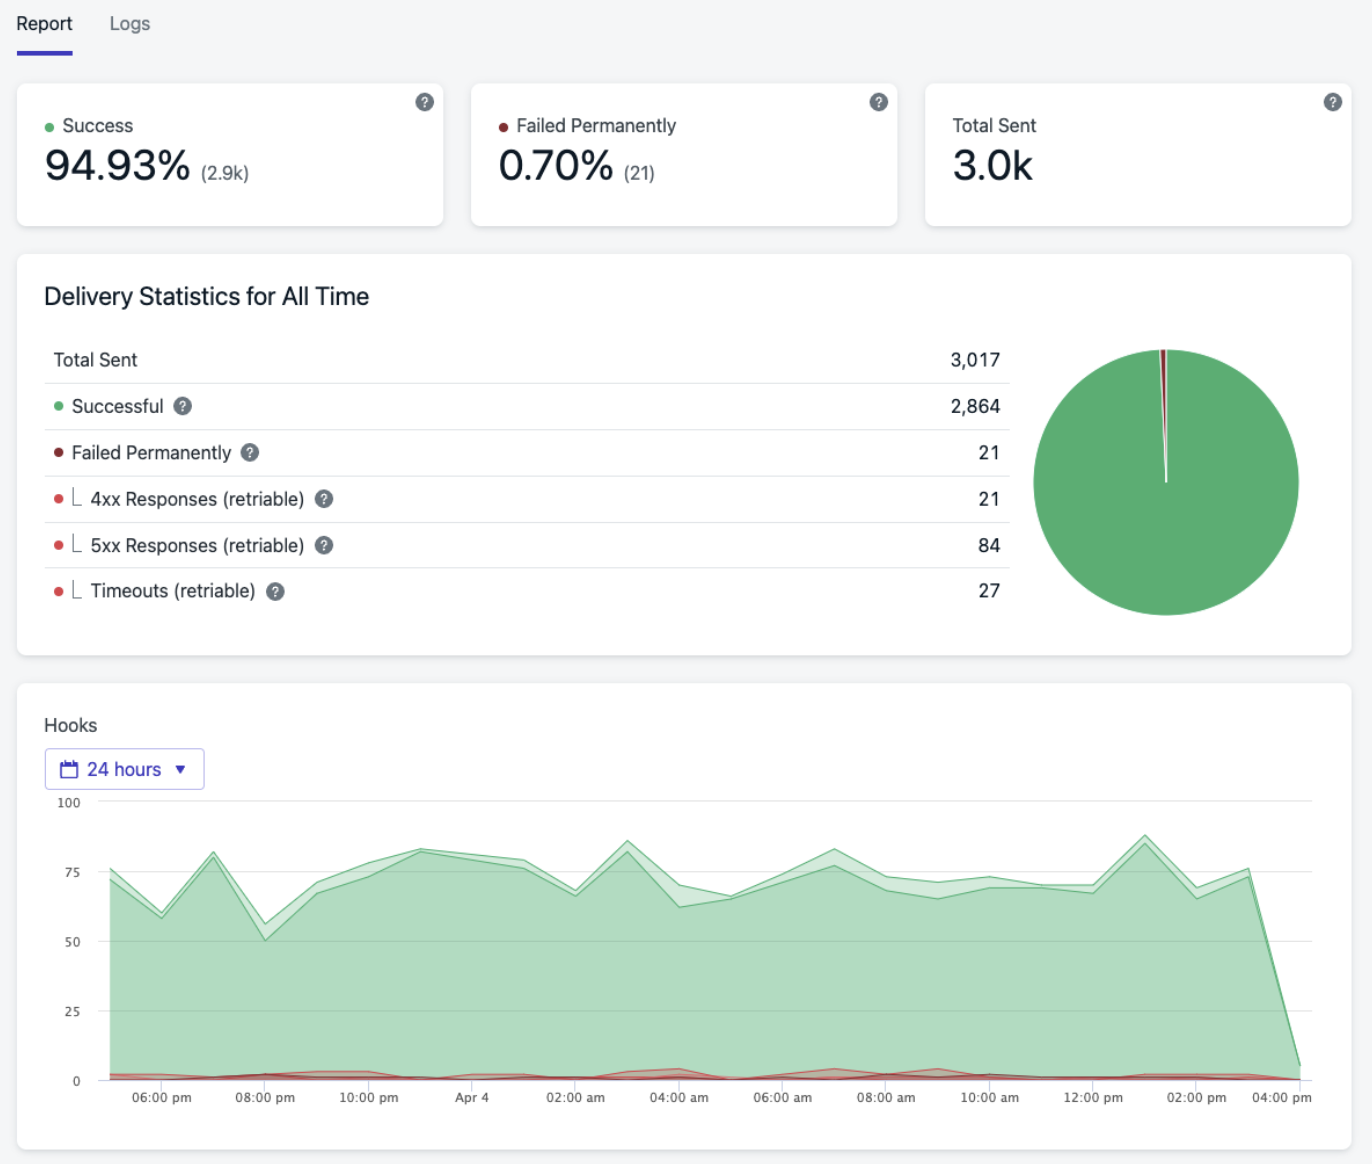
You can see how your event stream performs over a period of time on the event stream report page under the 'stats' tab. This will include all-time numbers, the current status of your event stream, and time series data showing what kind of responses the hook has been receiving. Any HTTP response in the 200 range indicates an event was successfully received, while responses in the 400s and 500s indicate errors. A timeout means the server on the other side didn't manage to respond within a reasonable amount of time so OneSignal closed the connection and assumed it failed.
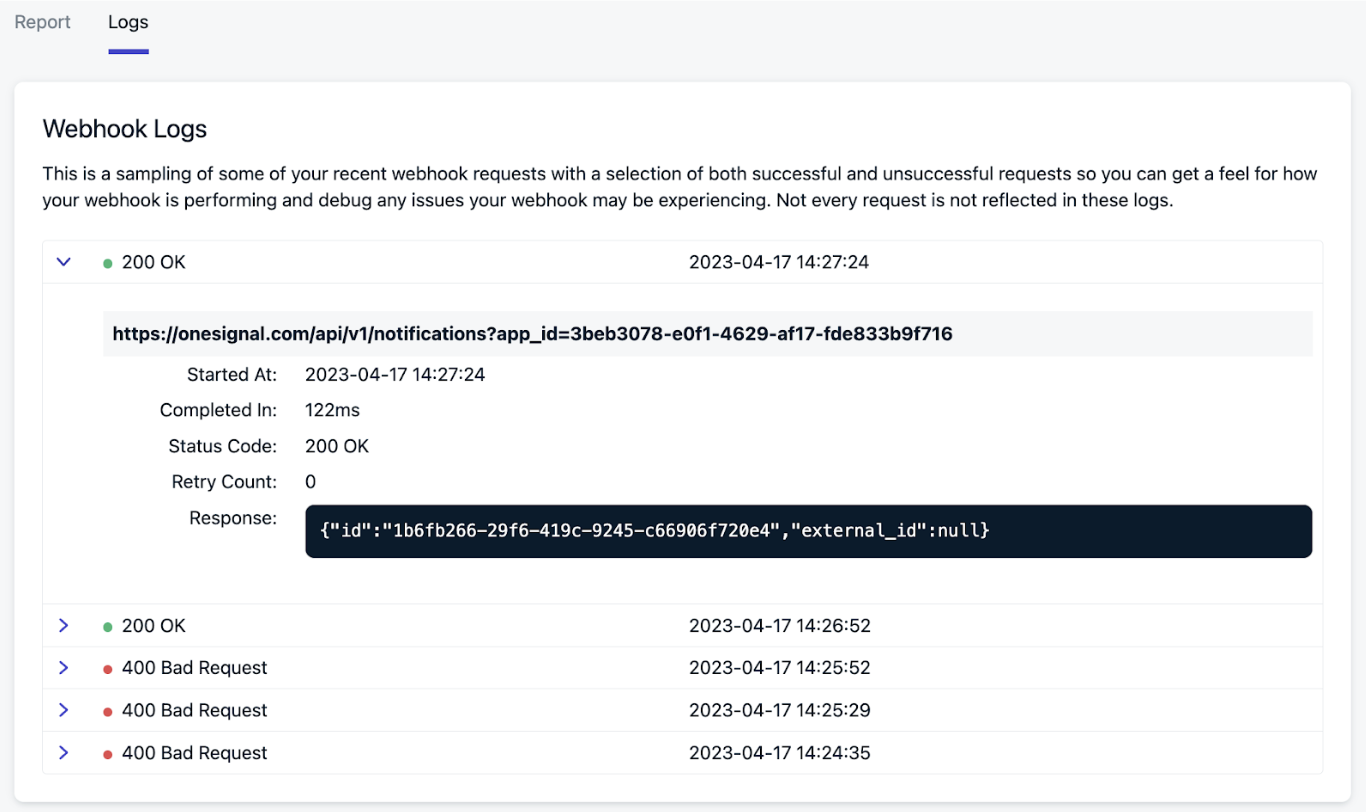
You can see a sampling of recent requests under the 'logs' tab for even more detail. This will show actual requests and the responses from the other side (if applicable). If your event stream has issues, this is a great place to look first. If you need to change/update your event stream, you can edit it on the form page and send test requests to see the full details you need until you can get it right.
Retries / Disabling
When an Event Stream request fails for any recoverable reason (for example, status code 429), OneSignal will retry sending the event again after a short delay. This will happen a few times with increasing delays between requests. If enough retries fail in a row, the hook will be marked as 'failed permanently' and will no longer be retried.
If too many separate requests fail in a row, this is probably because of an issue on the receiving end; the receiving end could have errors or have changed/disabled something. OneSignal will continue to send requests to a certain point, but if the requests continue to fail, the event stream might be disabled by OneSignal. If this happens, make sure to spend some time troubleshooting, fixing and then testing the event stream before re-enabling it.
A poorly performing API could lead to event stream disablement. It is important that the API which ingests an event stream is able to handle the volume of events which is produced by message sends. Reviewing the volume of message sends that are produced by your app will reflect the performance required of your API.
We recommend that the API receiving the event stream record an event without any other online processing. This will keep response times low and prevent any latency related issues. Slow response time or status code 429 responses from your API can cause a backlog of events. A consistent backlog of events will lead OneSignal to disable the event stream so you can update your API to handle the required throughput.
OneSignal will send out emails to app admins and org admins when an event stream starts to experience a significant volume of failed events (but has not yet been disabled) as well as an email when the event stream is disabled when too many events have failed to send. There will also be a banner on the event streams index page notifying a OneSignal user of issues with one of their event streams.
Each Event Stream has a unique event.id for each event. This can be used as a header or in the body of the message as a way to check and potentially deduplicate requests if you see the same ones coming through.
Tips for Success
- You typically will want to have event streams connect to your own servers, not third party services.
- While there is nothing wrong with connecting directly to a third party the following can be harder to manage: It will be more challenging to configure/debug
- The volume of requests will not be managed in OneSignal.
- Event stream events will be sent out as fast as users hit the steps in your journey and this might overwhelm other services, hit rate limits, or run up YOUR bill unexpectedly. This is especially common when trying to use another messaging channel for something like SMS. The flexibility of event streams means OneSignal does not know what you're trying to accomplish with them, so you may want to create a simple service of your own that accepts the event stream requests and then correctly handles your third-party connection limits, rate limits, and queue.
- Many services have public HTTP APIs which means you can connect to them with an event stream; look for their API docs and examples of how to make an HTTP request to find the right place to get started.
Updated 5 days ago
