Overview
This guide explains how to set up push notifications in your Angular application using theonesignal-ngx package, covering everything from installation to configuration and service worker management.
Requirements
- Configured OneSignal app and platform. See Web Push Setup to get started.
Installation
Install theonesignal-ngx package using your preferred package manager:
Initialization
Import the OneSignal service and initialize it in your root component:AppComponent constructor, which is the recommended approach. If you use ngOnInit instead, ensure it is not triggered multiple times due to route changes re-creating the root component. Alternatively, use a service with a guard to prevent re-initialization.Awaiting initialization
You can handle the promise returned byinit() in two ways:
Customizing init options
You can customize your initialization with additionalinit parameters.
Service Worker Settings
To avoid conflicts with Angular’s own service worker (used in PWA setups), specify a unique scope and path for the OneSignal service worker. If you haven’t done so already, you will need to download the OneSignal Service Worker file to add to your site. TheOneSignalSDKWorker.js file must be publicly accessible. You can put it in your public directory, top-level root, or a subdirectory. However, if you are placing the file in a subdirectory and/or have another service worker for your site, then make sure to specify the path. See OneSignal Service Worker for details.
Hosting the worker
- Public root (default):
/OneSignalSDKWorker.js - Custom folder (recommended): e.g.,
/onesignal/OneSignalSDKWorker.jsas set in the previous step.
Verify service worker hosting
Visit the path in your browser to confirm it’s accessible. If you used root:Important for Angular CLI users
If the file is not being served, ensure it’s listed in yourangular.json under the assets array:
Important notes
- Avoid Duplicate Initialization in Development
- When testing in a development environment, ensure OneSignal.init() is called only once.
- If you are using Angular’s OnInit lifecycle hook, make sure it is not triggered multiple times (e.g., due to route changes re-creating the root component). Consider initializing in the AppComponent constructor or using a service with a guard to prevent re-initialization.
Testing the OneSignal SDK integration
This guide helps you verify that your OneSignal SDK integration is working correctly by testing push notifications and subscription registration.Check web push subscriptions
Launch your site on a test device.
- Use Chrome, Firefox, Edge, or Safari while testing.
- Do not use Incognito or private browsing mode. Users cannot subscribe to push notifications in these modes.
- The prompts should appear based on your permission prompts configuration.
- Click Allow on the native prompt to subscribe to push notifications.
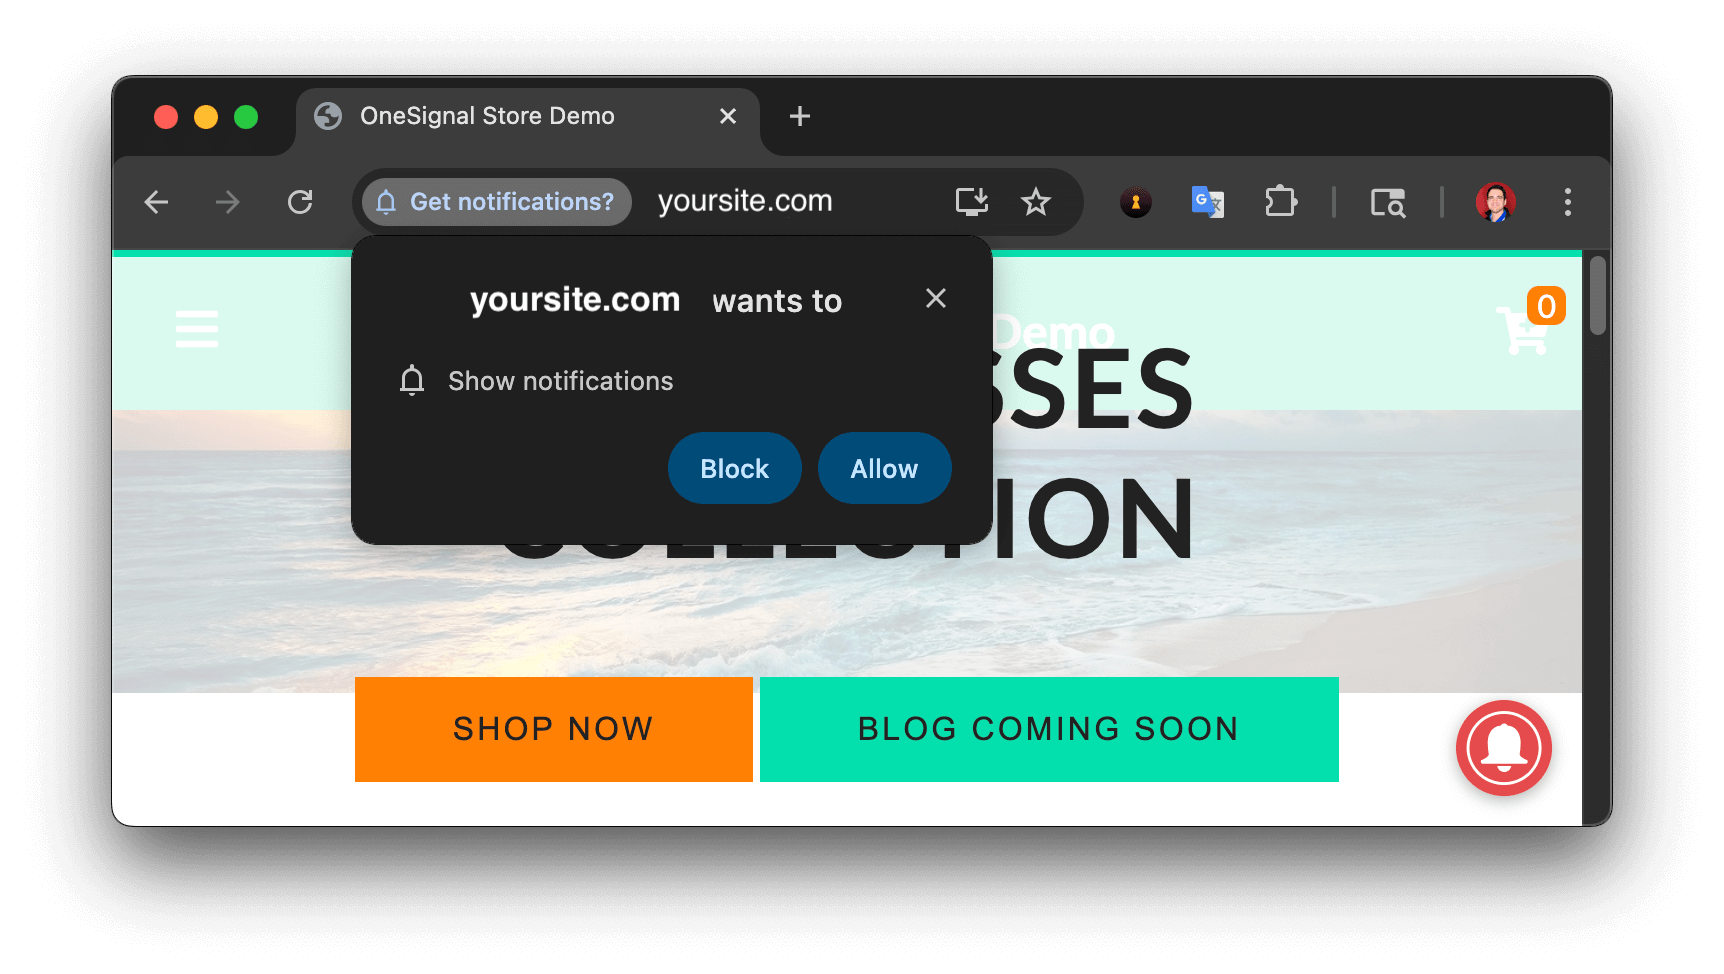
Web push native permission prompt
Check your OneSignal dashboard
- Go to Audience > Subscriptions.
- You should see a new entry with the status Subscribed.
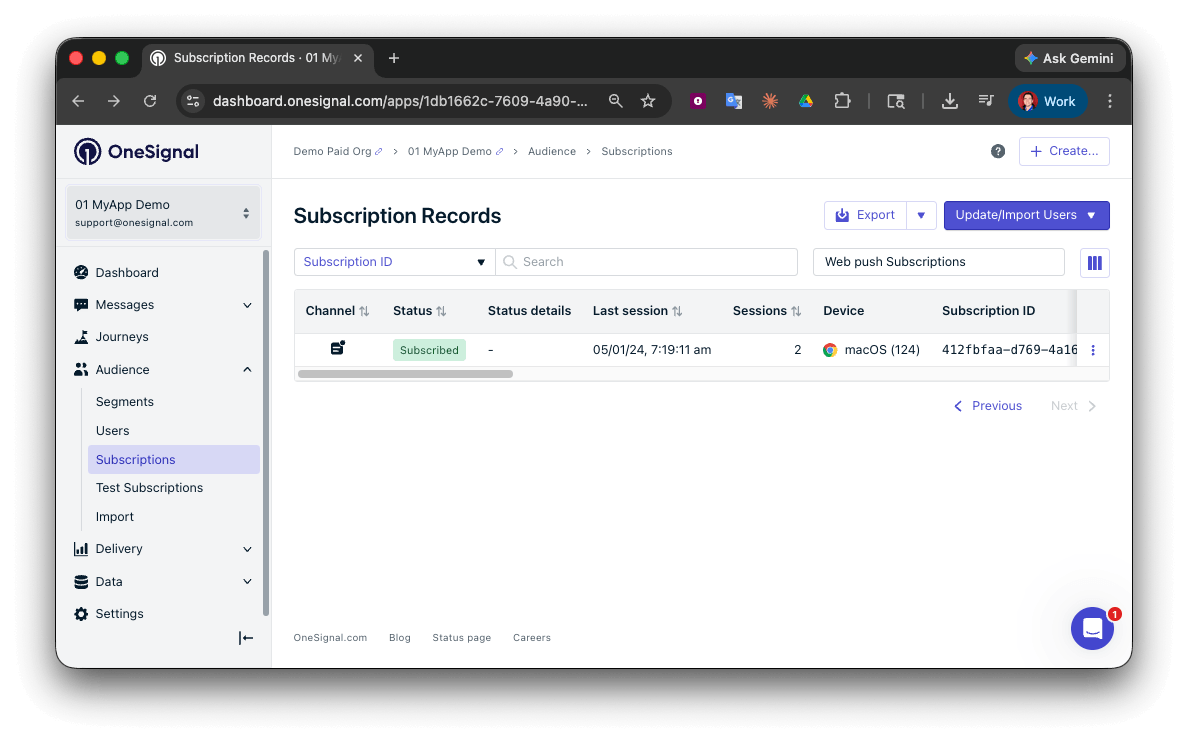
Dashboard showing subscription with 'Subscribed' status
Set up test users
test users are helpful for testing a push notification before sending a message.Add to Test Users.

Adding a device to Test Users
Name your subscription.
Create a test users segment.
Name the segment.
Test Users (the name is important because it will be used later).Add the Test Users filter and click Create Segment.

Creating a 'Test Users' segment with the Test Users filter
Send test push via API
Get your App API Key and App ID.
Update the provided code.
YOUR_APP_API_KEY and YOUR_APP_ID in the code below with your actual keys. This code uses the Test Users segment created earlier.Run the code.
Check images and confirmed receipt.
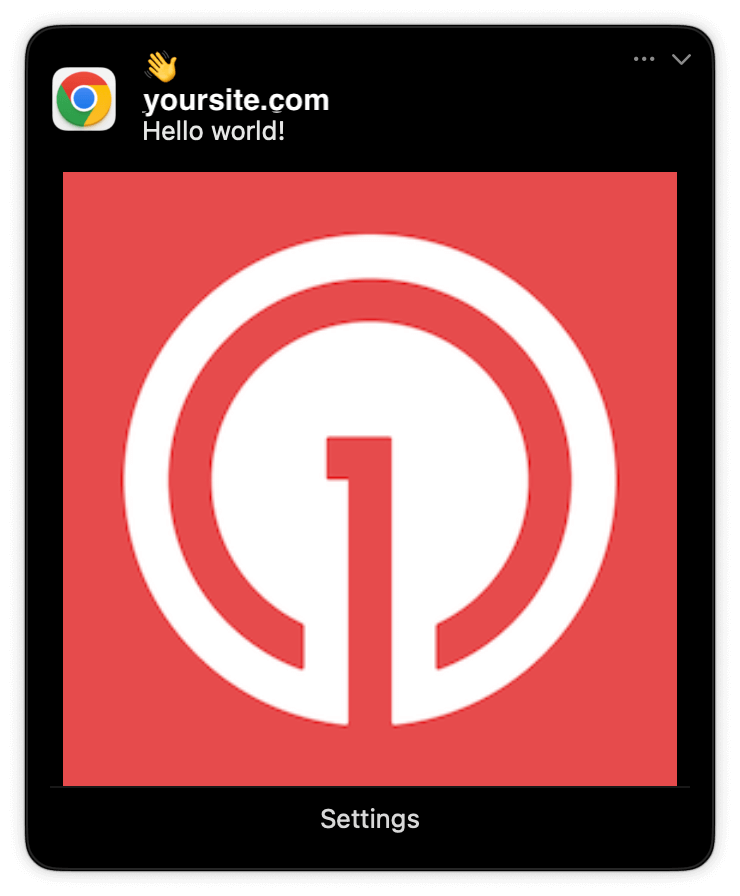
Expanded push notification with image on Chrome macOS
Check for confirmed receipt.
Push notification message reports
support@onesignal.com with the following:
- The API request and response (copy-paste into a
.txtfile) - Your Subscription ID
- Your website URL with the OneSignal code
User identification
The previous section covered creating web push Subscriptions. This section expands to identifying Users across all their subscriptions (including push, email, and SMS) using the OneSignal SDK. It covers External IDs, tags, multi-channel subscriptions, privacy, and event tracking to help you unify and engage users across platforms.Assign External ID
Use an External ID to identify users consistently across devices, email addresses, and phone numbers using your backend’s user identifier. This ensures your messaging stays unified across channels and 3rd party systems (especially important for Integrations). Set the External ID with the SDK’slogin method each time a user is identified by your app.
Add Tags
Tags are key-value pairs of string data you can use to store user properties (likeusername, role, or preferences) and events (like purchase_date, game_level, or user interactions). Tags power advanced Message Personalization and Segmentation allowing for more advanced use cases.
Set tags with the SDK’s addTag and addTags methods as events occur in your app.
In this example, the user reached level 6 identifiable by the tag called current_level set to a value of 6.
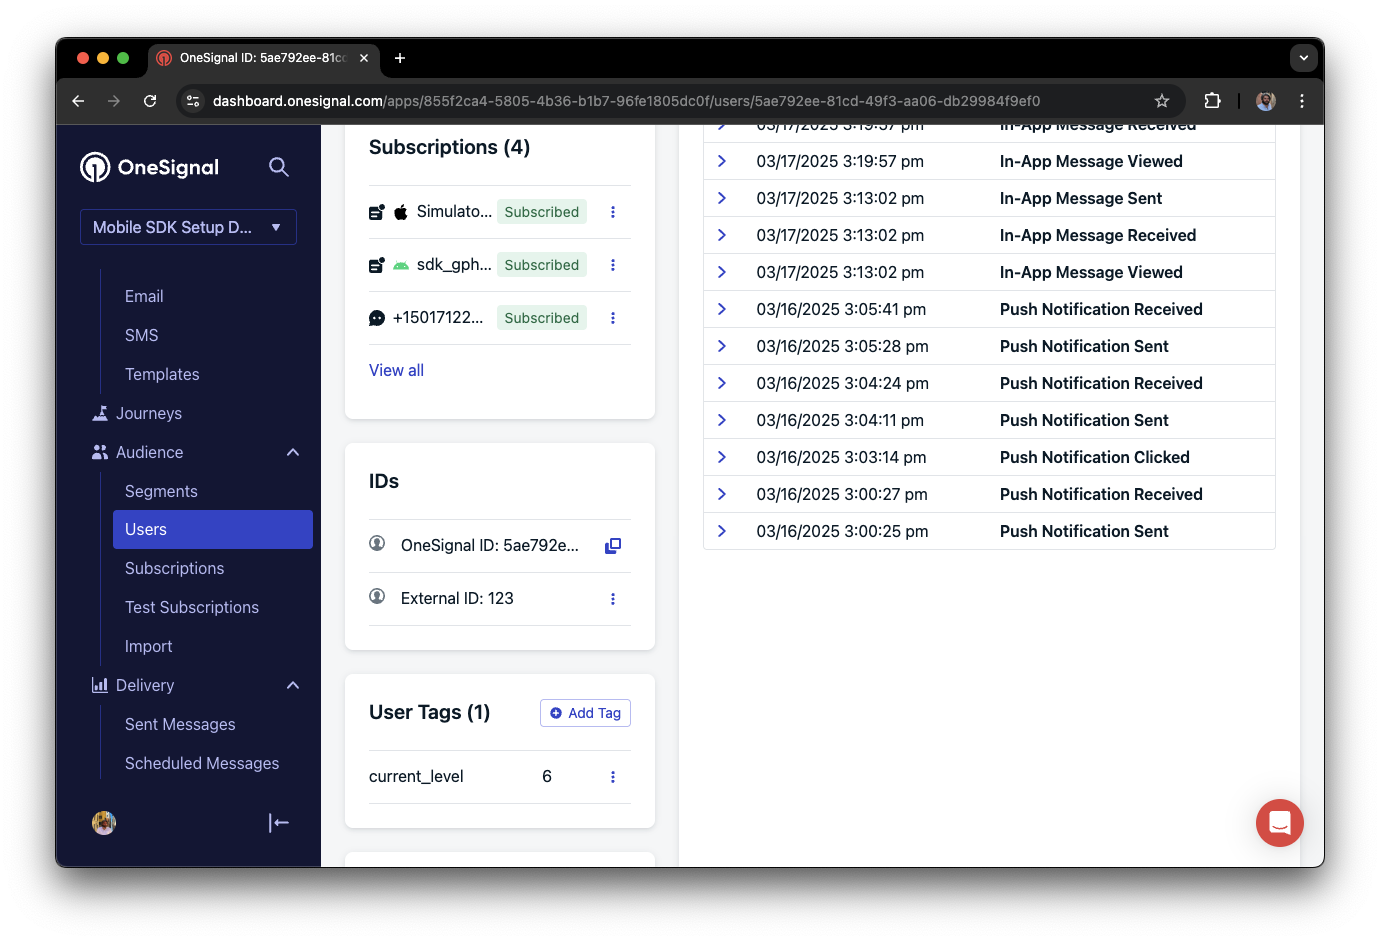
A user profile in OneSignal with a tag called "current_level" set to "6"
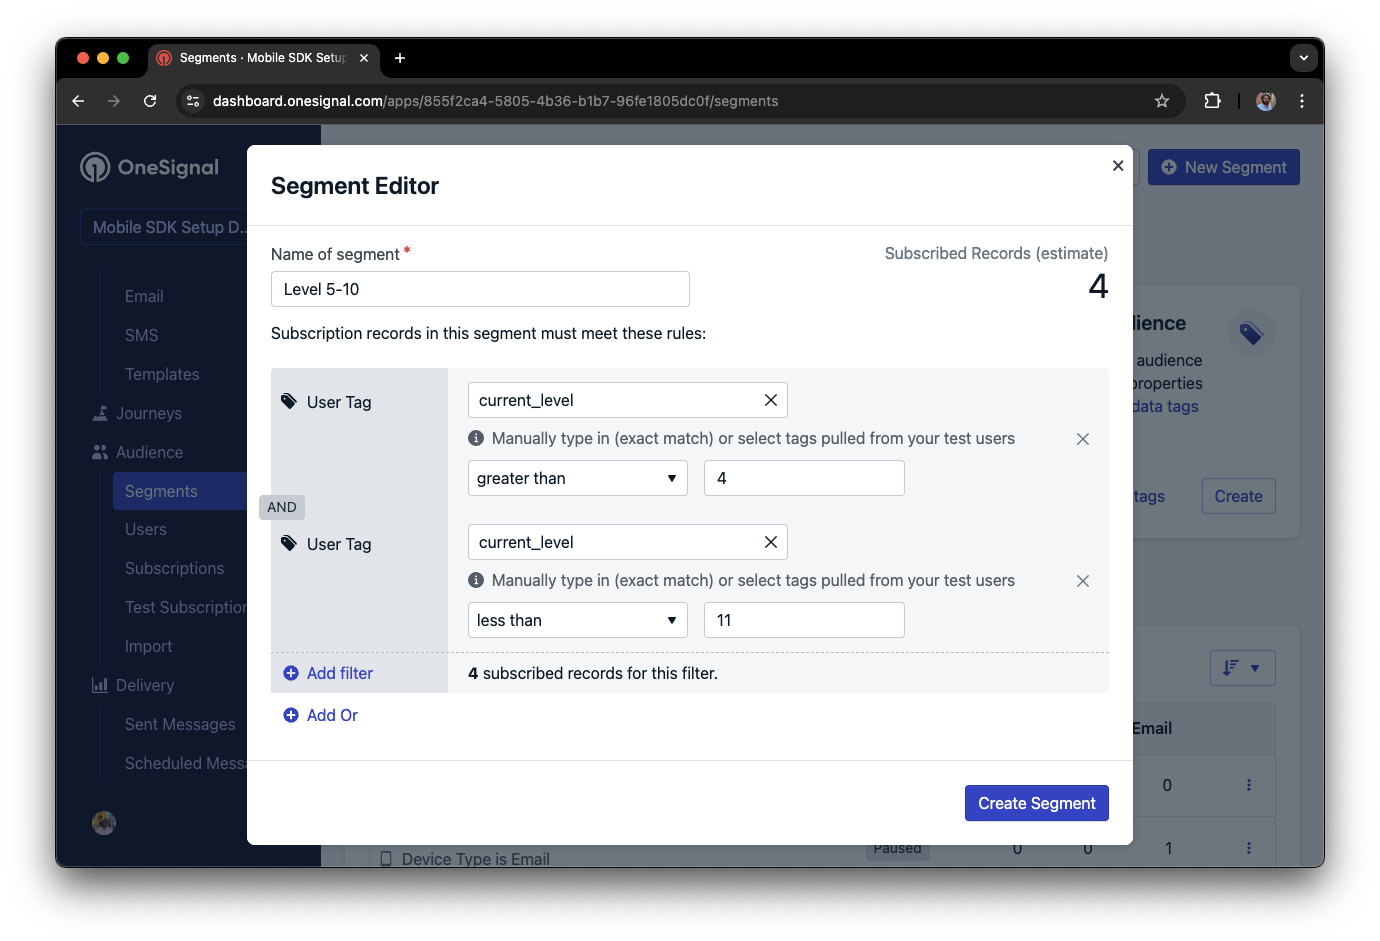
Segment editor showing a segment targeting users with a current_level value of greater than 4 and less than 10
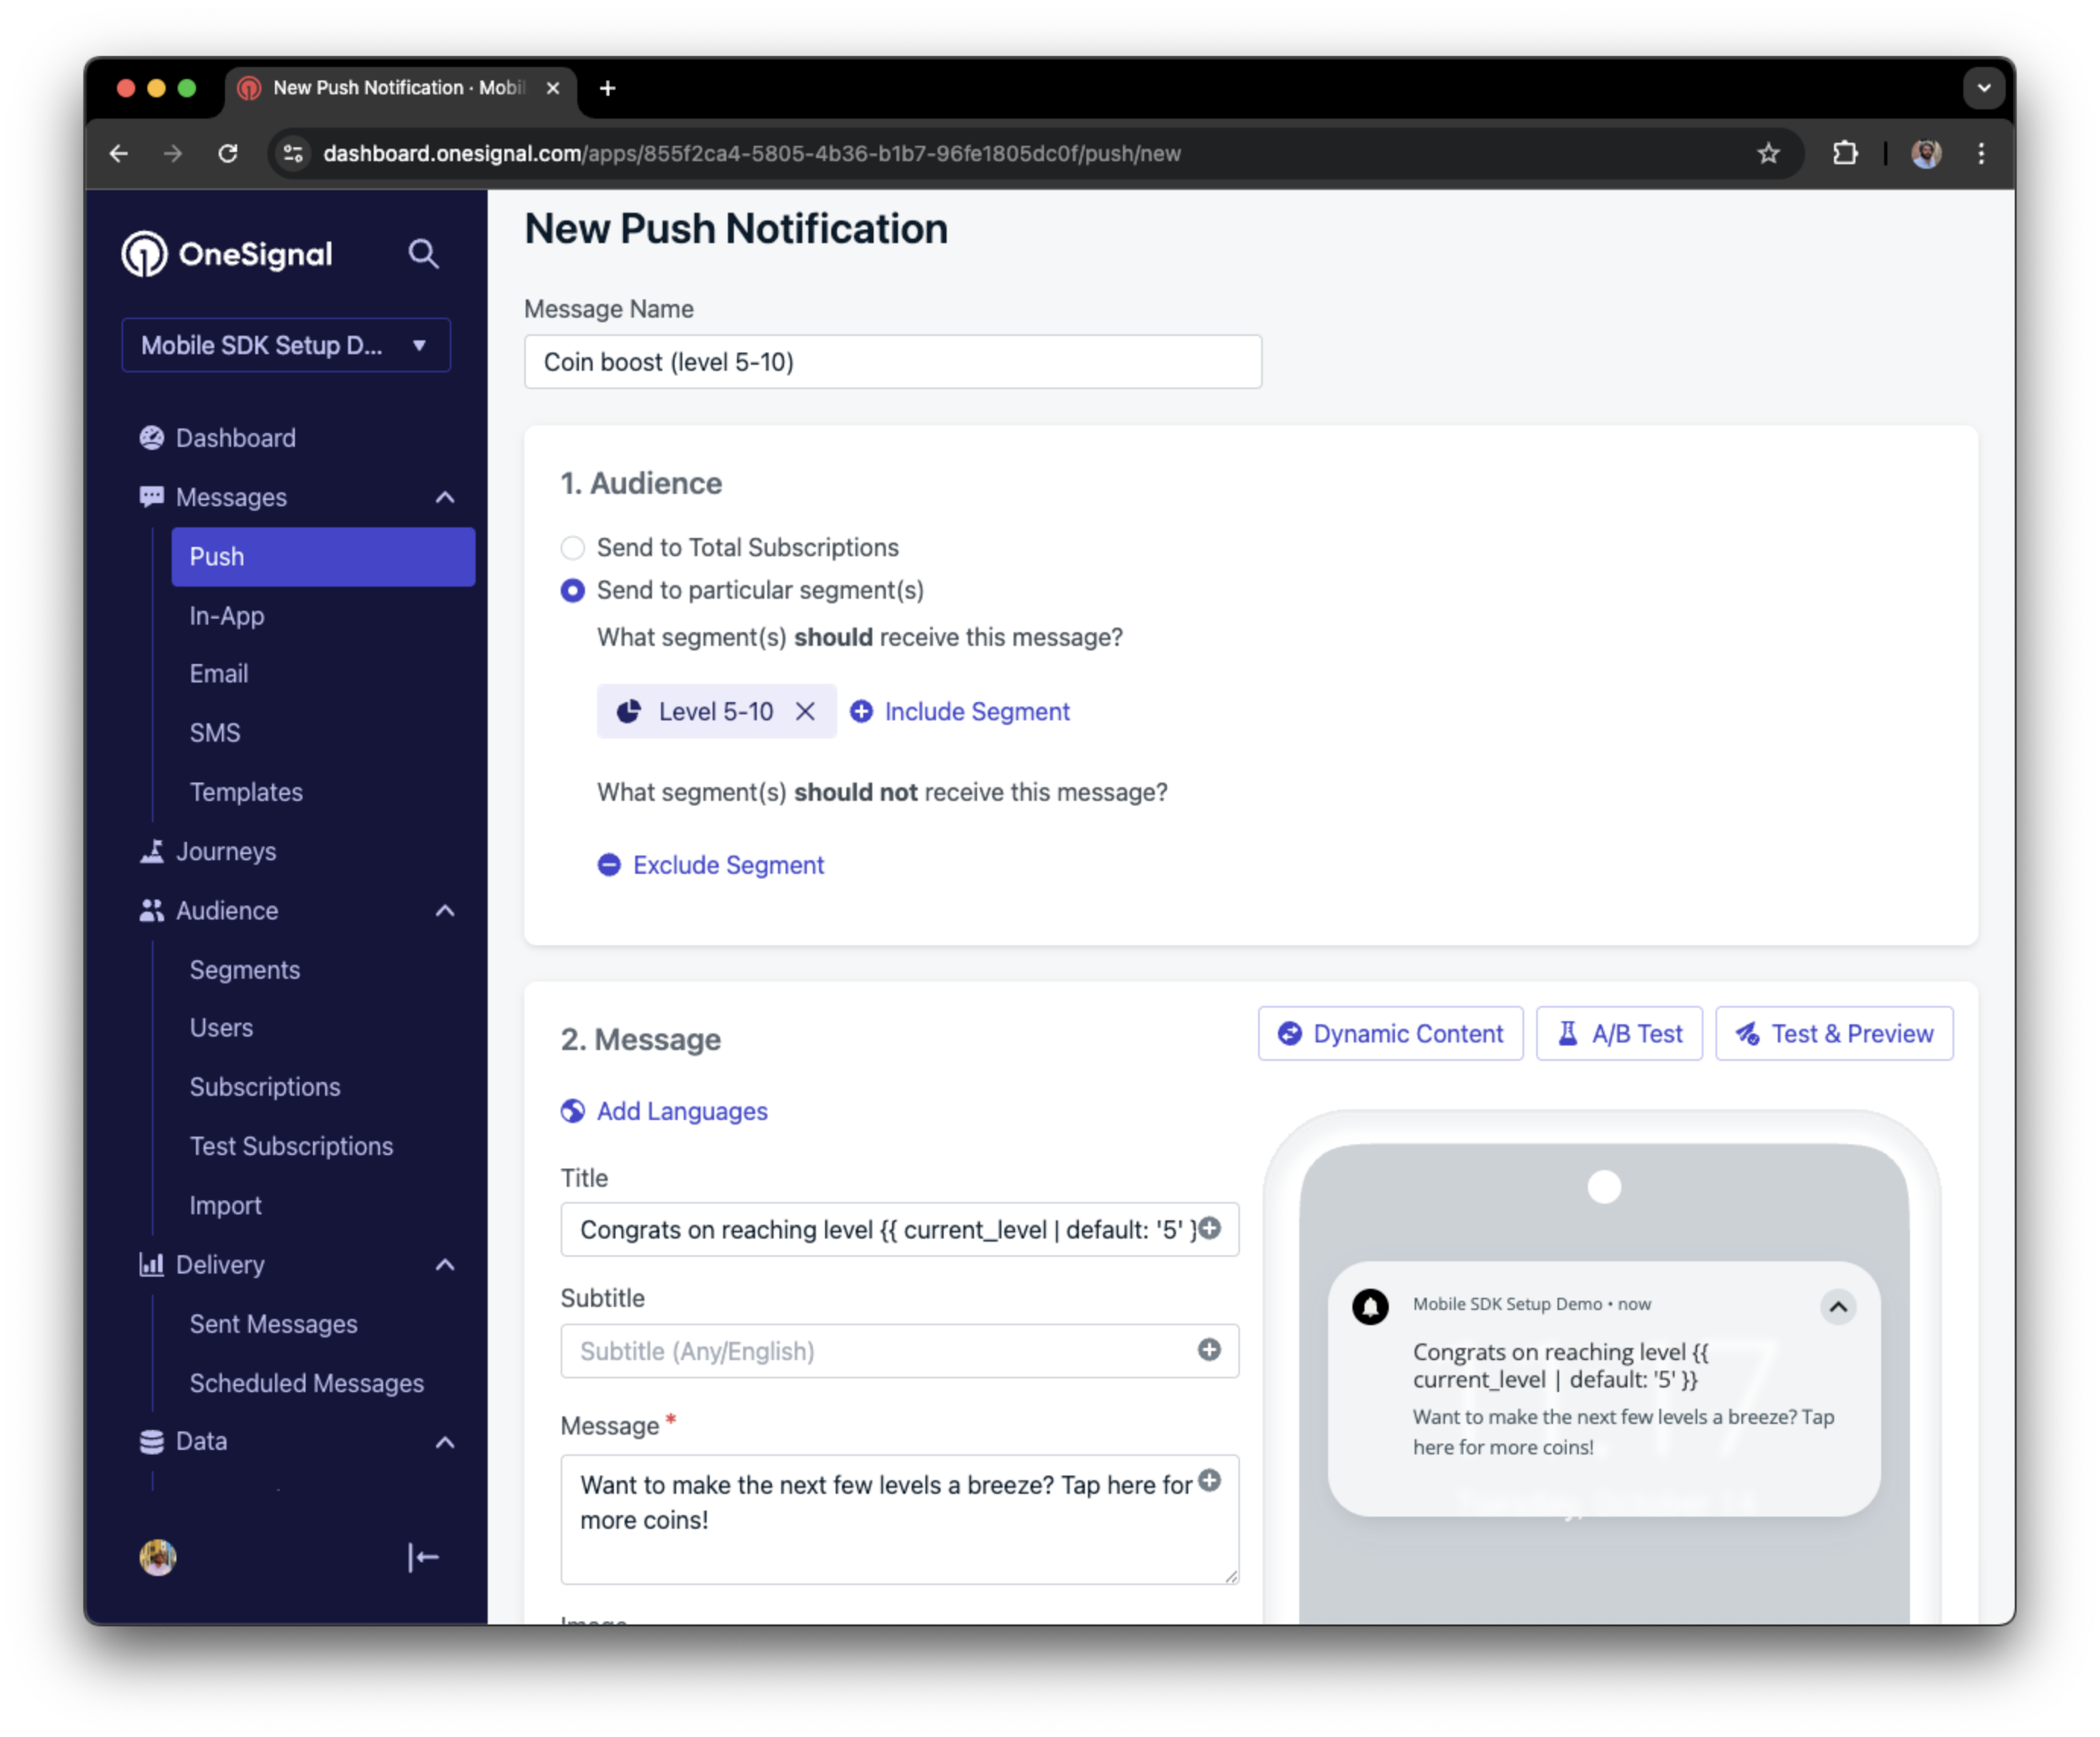
Push notification targeting the Level 5-10 segment with a personalized message
Add email and/or SMS subscriptions
The OneSignal SDK creates web push subscriptions automatically when users opt in. You can also reach users through email and SMS channels by creating the corresponding subscriptions.- Use the
addEmailmethod to create email subscriptions. - Use the
addSmsmethod to create SMS subscriptions.
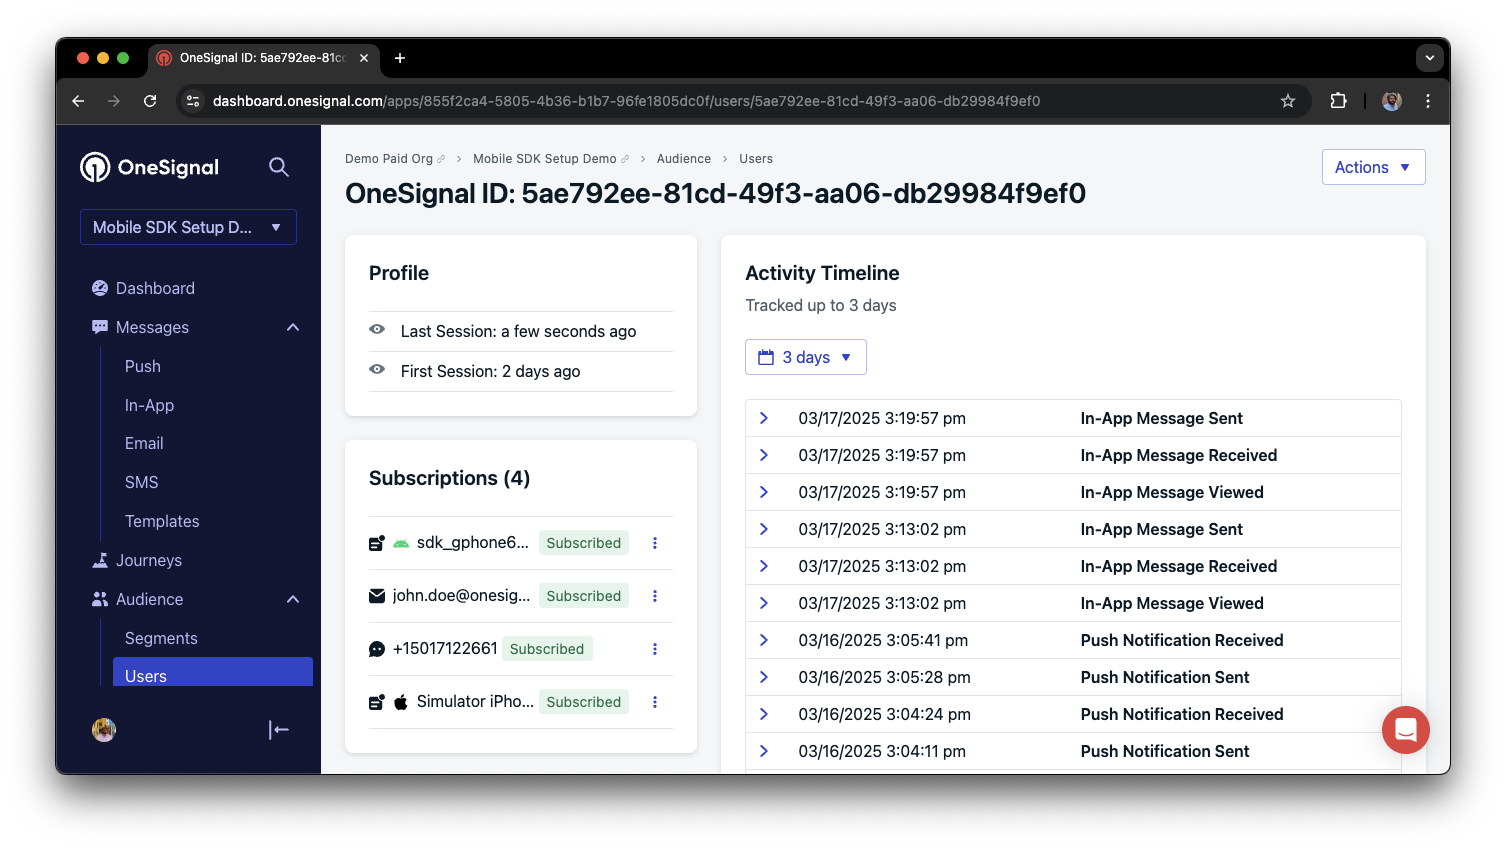
A user profile with push, email, and SMS subscriptions unified by External ID
- Obtain explicit consent before adding email or SMS subscriptions.
- Explain the benefits of each communication channel to users.
- Provide channel preferences so users can select which channels they prefer.
Privacy & user consent
To control when OneSignal collects user data, use the SDK’s consent gating methods:setConsentRequired(true): Prevents data collection until consent is given.setConsentGiven(true): Enables data collection once consent is granted.
Data collected by the SDK
Handling personal data
Listen to push, user, and in-app events
Use SDK listeners to react to user actions and state changes. The SDK provides several event listeners you can hook into. See the SDK reference guide for more details.Push notification events
- Click event listener: Detect when a notification is tapped.
- Foreground lifecycle listener: Control how notifications behave in foreground.
User state changes
- User state change event listener: Detect when the External ID is set.
- Permission observer: Track the user’s specific interaction with the native push permission prompt.
- Push subscription change observer: Track when the push subscription status changes.
Advanced setup & capabilities
Explore more capabilities to enhance your integration:Migrating to OneSignal
Integrations
Action buttons
Multi-language messaging
Identity Verification
Custom Outcomes
Web SDK setup & reference
Web push setup
Web SDK reference
support@onesignal.comPlease include:- Details of the issue you’re experiencing and steps to reproduce if available
- Your OneSignal App ID
- The External ID or Subscription ID if applicable
- The URL to the message you tested in the OneSignal Dashboard if applicable
- Any relevant logs or error messages